Preparing for & Installing Solar
Overview
As people begin to consider solar, they frequently would prefer to NOT do the investigation necessary to determine how much capacity they need. To say “I have a 25 ft. Class C or a 38 ft. 5th wheel” does not provide a basis for determining how much solar capacity you need. If you have an all electric, residential fridge with an ice maker & want to run your microwave, coffee maker, etc., your needs will be much different than someone who has a fridge they can and will run on propane and will make their coffee in an old style percolator on the stove. Therefore, there are no simple answers, no basic “rule of thumb”, to the question of “how much solar do I need”.
Solar: Evaluation & Decisions
STEP ONE: The first question you must ask is: “Why do I want solar?” In my opinion, the only realistic reason to install solar is that you want to be able to camp for several days (or more) without any hook-ups (boondocking). Boondocking allows you to avoid campground fees, but even at $50 a night, it will take at 150 or so nights to pay for your solar installation. If you aren’t willing to spend $3,000 – $7,000, you will have to be VERY frugal with your electrical usage when off-the-grid. It “can” be done & some people do it; but you won’t use the TV or electrical appliances very much. (My DW would not be happy with that arrangement!)
“Solar use, and living “off-grid”, is a lifestyle decision. Adding an effective solar system to an RV will take months of living off-grid to pay back the costs of installing it. You will not likely recoup your investment when selling the rig. The best (and really only) reason to add solar is so you have the option of boondocking for long periods of time without hookups. If you do not enjoy doing this, then you should reflect on why you want to install a solar system.” [excerpts from Dan Mayer’s excellent website: http://jackdanmayer.com/rv_electrical_and_solar.htm]
STEP TWO: How much capacity do we need???
First, remember that your RV really has TWO electrical systems — a 12 volt system that already runs your lights, furnace fan, and similar items; and a 120 volt system (shore power) that runs the microwave, coffee pot, TV, etc. If your current battery is charged, you can easily tell which items are which by disconnecting your shore power cable (and turning off your inverter, if you have one) — anything that stays on is on the 12 volt system, anything that goes off is on the 120 volt system.
If you are going to have solar you have to do your own energy use review. As I said before, there are no reliable ‘rule of thumb’ guides.
— 12 volt usage: The best way to measure your 12 volt usage is to get and install a Trimetric Meter. It’s connectors are installed between your battery bank and your 12 volt load, and it records how much electricity you have used. Turn OFF your current battery charger and you can read how much you are currently using, or how much has been drained from your battery. If you go solar, you will want this meter anyhow, so this is not “wasted” money.
— 120 volt usage: The most reasonable way to calculate 120 volt usage is to identify what items you intend to use when on solar (microwave, yes; electric water heater, no; etc.) Purchase a “Kill-a-watt” meter for $15 or $20 at Home Depot or Lowes, and connect it to EACH and EVERY item that you plan to use when on solar — TV, microwave, computer, electric fan, sun lamp (just kidding), etc. Record their actual watts used and estimate how many hours you will use the item over the course of an average day.
Add up all the watts of power you expect to use on an average day.
(Watts of use) x (hours of use) = (daily watts)
Conversion of electricity from one voltage to another is not 100% efficient. Multiply the (daily watts) by a safety factor say 1.2 to be safe.
(Daily Watts) / 12 volts = The number of 12v Amp Hours you will need (the typical RV batteries are rated in 12v Amp Hours or Ah). All solar requirements need to be converted to 12 Volt Amp Hours; that is what your batteries store.
(While you are at it, also note the highest simultaneous wattage required by devices that will be used at the same time, ie, the coffee pot & microwave at the same time. This will help determine how big your power inverter must be — see STEP Four). Here is the results of our energy usage review:
12 volt usage per day: 1000 watts
120 volt usage per day: 2000 watts
Total estimated usage: 3000 watts per day
Plus safety factor: 3000 x 1.2 = 3600 watts per day
12v Amp Hours = 3600 / 12 = 300 Ah
Here is an Excel spreadsheet that I used to calculate usage/demand: Electrical Consumption Calculations
STEP THREE: How many batteries, and what kind??? All of your solar power is going to go to recharge the batteries, your batteries will be actually providing the electricity for your RV. Different batteries have different charge/discharge limits. The most common type (because of cost) is lead-acid batteries (either flooded cell or AGM) — similar, but not identical to those starting your car. Lead-acid batteries should not be discharged below 1/2 of their rated capacity; therefore a battery rated for 100 amp hours should never have more than 50 amp hours drawn out of it before it is recharged. The further you discharge the battery, the shorter the battery’s life. Lithium (LiFePO4) batteries can reasonably be discharged down to 15% or less of their capacity, but they are more expensive. In either case, you never want to discharge a battery below the recommended threshold, and you should take that threshold into account on all of your calculations.
If you need 300 amp hours of 12 volt power to run your RV for a day, and you are using lead-acid batteries, you will need AT LEAST 600 amp hours of 12 volt storage capacity. If you think it might ever rain or be cloudy so that your solar system does not charge your batteries on those days, you need additional storage capacity to cover those “no solar” days. (2x ??, 3 x ???, that’s up to you!)
Lead-acid batteries are heavy! A standard for many RVers is the Trojan T-105 deep cycle battery. It is a battery designed to be drawn down to 50% State of Charge (SoC) again and again — unlike a car’s starting battery. These are 6 volt ‘golf cart’ batteries, so they must be installed in pairs. They are rated at a 20-hour rating of 225 Amp Hours, so two wired in series would provide 110 Ah of 12v power before reaching the 50% threshold. They weigh 62# each. So a bank that would provide a usable capacity of 440 Ah would require eight batteries for a total of almost 500#!! They cost about $160 each, so an 8 battery bank would cost about $1,300. The Trojan T-105 is a flooded cell battery requiring regular monitoring and maintenance.
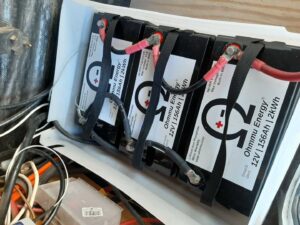
Lithium batteries are much lighter and fewer are required — Battle Born is a common standard for RV lithium batteries. Their 100 Ah battery has an actual capacity of about 120 Ah with an automatic cut-off at 100 Ah used, so you can use the full rated capacity. Each battery weighs 31# and four would support the same system that the 8 lead-acid batteries would, so your total weight would be about 125# and they would take up only half the space! However, those four batteries would cost $3,600 – $4,000. A final factor for consideration: properly cared for, the lithium batteries should last at least twice as long as the lead-acid batteries and includes a Battery Management System (BMS) and would require no maintenance. A relatively new entry into the RV lithium battery market is Ohmmu, a company that has been providing aftermarket lithium batteries to the electrical vehicle market. Here is a link to the batteries we just bought: 150+ Ah Deep Cycle Lithium
STEP FOUR: How big of an inverter?? First, what IS an inverter & which kind? An inverter converts the 12 volt power from your batteries into 120 volt power that your TV & microwave can use. There are two kinds of inverters: MODIFIED sine-wave and PURE sine-wave. Pure sine-wave is just like what you get from the electric company, maybe better; Modified sine-wave attempts to approximate the plus & minus cycles of 120 volt power with steps (sometimes very crude steps). Pure sine-wave will run your computer, TV, microwave, etc. just like you were connected to the electric company; sometimes, computers, TVs, microwaves do not work well on modified sine-wave, or they fail prematurely. Many people use modified sine-wave successfully, but I personally will only use a pure sine-wave inverter.
So, how big? You need to evaluate the power requirements of the most power hungery 120 volt items you might use SIMULTANEOUSLY. If you must run the coffee pot, microwave, and toaster all at the same time, you are going to need a BIG inverter. If you can let one finish before you start the next one, your requirements will not be so large. Look at your 120 volt usage chart you created in step two and decide how much will be used at the same time — then add a safety factor … Murphy does tag along, even in our RVs.
STEP FIVE: How much solar and what kind of a solar charger?? You now know how much 12 volt electricity you expect to use in amp hours. Now, how much sun do you expect to have where you will typically be using your solar? Will you be tilting your panels to maximize your solar harvest? I didn’t want to have to climb up on the roof to tilt the panels, and also make sure I parked with a good orientation to the sun, therefore I permanently mounted my panels flat on the roof and figured I would get about 70% efficiency for 6 – 8 hours each day and would get “some” sun every day in the U.S. Southwest. My estimated usage would be 300 amp hours or less, so I went with 4 panels at 260 watts each totaling 1040 watts at full capacity and about 60 amps per hour at 70% efficiency or 360 amp hours over a six hour charging day. (If I get better solar harvest than this, that’s great.) ( *** See Below)
Your charger must be determined by the solar panels you purchase. If you use higher capacity panels (as I did) then they will be sending power down as 24, 30, 36 or even higher voltages which will reduce line loss (see STEP SIX). Your charging unit must be able to accept this higher voltage and send the appropriate charging output for your batteries (an MMPT unit). It also must be able to utilize the power coming from the solar panels for charging your batteries — it does no good to have the equivalent of 100 amps of 12 volt coming down from your panels if your charger can only send 30 amps of 12 volt power to the batteries each hour.
STEP SIX: Wires and other “stuff”. As power is transmitted through our electrical wires resistance steals part of the power. The longer the wire run, the greater the power loss. So, how do the power companies transmit power over hundreds of miles? Higher voltage! The higher the voltage, the less the loss in a given size of wire. You will have less power loss when running 8 gauge wire than when running 12 gauge (the smaller the number, the bigger the wire — don’t ask me why!) You will also have less loss running 60 Volt power than running 12 volt power.
So, make long runs using higher voltage if possible. Use the largest practical wire for any particular run and calculate your voltage drop — attempting to keep the drop to less than 0.5%. Here is a calculator that I like: Calculator.net or you can search for “voltage drop calculator” to find one you like.
You will want to make most/all of your connections to a “buss bar”, a high capacity electrical conductor that you can bolt all of your cables onto. Of course, you will want to put fuses or circuit breakers on each segment of your new electrical system, you don’t want an “oops” to destroy the whole system!
STEP SEVEN: Preparing to install. I strongly recommend that you plan out your entire solar installation before you start buying components. With a well thought out plan you can buy items piecemeal and not end up wasting money by buying the wrong items.
I recommend that you start with the Trimetric Battery Meter, then the batteries, then other items.
*** How Much Solar Yield Should I Expect ***
With the same solar setup, you will get much different results if you are in Portland, Oregon, in December, as compared to Phoenix, Arizona, in the summer (although I would never chose to stay in Phoenix in the summer! 120 degrees!) I found a great web site that helps you set “reasonable” expectations on how much solar power you should expect to yield from a particular setup & location:
You can put in your info: location, wattage of panels, tilt, etc. It will generate a graph of the “capacity factor” (comparing actual vs. rated output capacity x 24 hrs/day). So, if you are in Quartzsite with 1000 W of solar panels in February, the factor is about 15% — so you can reasonably expect to generate 3600 Watts (1000 watts x 24 hours x 0.15 = 3,600 watts) over the course of a day, or about 300 Ah of 12 volt power per day.
You can also download the underlying data to a spreadsheet to look at any day or time period you want. Their data takes into account normal weather, so “typical” cloudiness is factored in.
I also recommend the following web sites, see below.
OUR SOLAR INSTALLATION:
After much review of recommendations from various forum sources, especially from
- Jack Mayer’s excellent website (http://jackdanmayer.com/rv_electrical_and_solar.htm),
- The 12-Volt Side of Life (http://www.marxrv.com/12volt/12volta.htm), and of course
- Handy Bob’s “The RV Battery Charging Puzzle” (https://handybobsolar.wordpress.com/the-rv-battery-charging-puzzle-2/)
We decided to go with four larger 60 cell panels rated at 265 watts and a nominal voltage of 30 volts, in two pairs of serial connections with a net output of 8.8 Amps at 60 volts. This allows greater Solar Capacity with fewer panels, and the higher voltage reduces the voltage drop problem associated with transmitting DC power.
This configuration will “max out” the capability of the Morningstar Tristar TS-MPPT-60 Solar Charge Controller. To add more panels, we will need to get another Tristar plus a HUB-1 Meter Hub to combine the two Tristar units. Hopefully, we can be a little conservation minded and avoid that. Our original setup used wet-cell lead acid batteries. After over 5 years of constant use, we have now switched to lithium (more on that later). I had contemplated going with a 6 battery bank, but that left very little safety factor. So we expanded to a 8 battery bank to push our usable capacity up to 450 Amp Hours. Since the 6 hours of effective solar time is probably rather conservative, we could very likely be generating at least 450 Ah of power with this setup, especially in the American Southwest. However, remember that your battery charger reduces its output as the batteries approach full charge.
There are many from the Escapees Forum who provided great help, insights, and recommendations. To all of you, Thanks! For those who said “Plan it out in detail ahead of time”, you are SO RIGHT! When I connected everything & threw the switch – it worked!
Calculating Demand
There is not a book that I am aware of that accurately tells the power usage of most items. My best recommendation is to buy a “KillAWatt” meter (about $25 at most home improvement centers) and test/check all of you 110 requirements. Here are the numbers I used in my calculations. I have included items we do not use (but others may) when on solar power:
| APPLIANCE | Est Watts | Act Watt | Volts | Amps /hour | Use hours | Daily watt hrs. | 12 V Amp hrs. |
| 32″ Flat Panel TV | 200 | 75 | 120 | 1.7 | 2 | 150 | 12.5 |
| VCR/DVD | 50 | 120 | 0.4 | 2 | 100 | 8.3 | |
| Blender | 300 | 120 | 2.5 | 0.25 | 75 | 6.3 | |
| Ceiling Fan | 100 | 120 | 0.8 | 4 | 400 | 33.3 | |
| Clock Radio | 10 | 120 | 0.1 | 0 | 0 | 0.0 | |
| Clothes Dryer | 120 | 0.0 | 0 | 0 | 0.0 | ||
| Clothes Washer | 120 | 0.0 | 0 | 0.0 | |||
| Coffee Maker – brew | 1,250 | 500 | 120 | 10.4 | 0.25 | 125 | 10.4 |
| Coffee Maker – warmer | 200 | 120 | 1.7 | 0 | 0 | 0.0 | |
| Computer | 200 | 120 | 1.7 | 2 | 400 | 33.3 | |
| Computer Monitor | 100 | 120 | 0.8 | 2 | 200 | 16.7 | |
| Computer Printer | 20 | 120 | 0.2 | 0.25 | 5 | 0.4 | |
| Elec. Fireplace | 120 | 0.0 | 0 | 0.0 | |||
| Electric blanket (up to 500w) | 150 | 120 | 1.3 | 8 | 0.7 | ||
| Electric drill | 500 | 120 | 4.2 | 0 | 0.0 | ||
| Hair Dryer | 1,500 | 120 | 12.5 | 0 | 0.0 | ||
| Heating Pad | 50 | 120 | 0.4 | 0 | 0.0 | ||
| Household Refrig (40%) | 725 | 120 | 6.0 | 0 | 0.0 | ||
| Laptop Computer | 150 | 120 | 1.3 | 2 | 300 | 25.0 | |
| Microwave | 1,250 | 1,200 | 120 | 10.4 | 0.5 | 600 | 50.0 |
| Refrig P/E (in elec mode- 5-8) | 960 | 120 | 8.0 | 0 | 0.0 | ||
| Slow Cooker | 300 | 120 | 2.5 | 0 | 0 | 0.0 | |
| Stereo | 50 | 120 | 0.4 | 2 | 100 | 8.3 | |
| Toaster | 1,250 | 800 | 120 | 10.4 | 0.25 | 200 | 16.7 |
| 0.0 | 0 | 0.0 | |||||
| 0.0 | 0 | 0.0 | |||||
| Total | 9,315 | 120 | 78 | 5,257 | 330 |
Estimated Daily Electrical Usage = 330 12V Amp Hours
Our Equipment:
1 Trimetric 2030 Battery Meter
1 MNPV3 Box & MNEPV63 Breakers
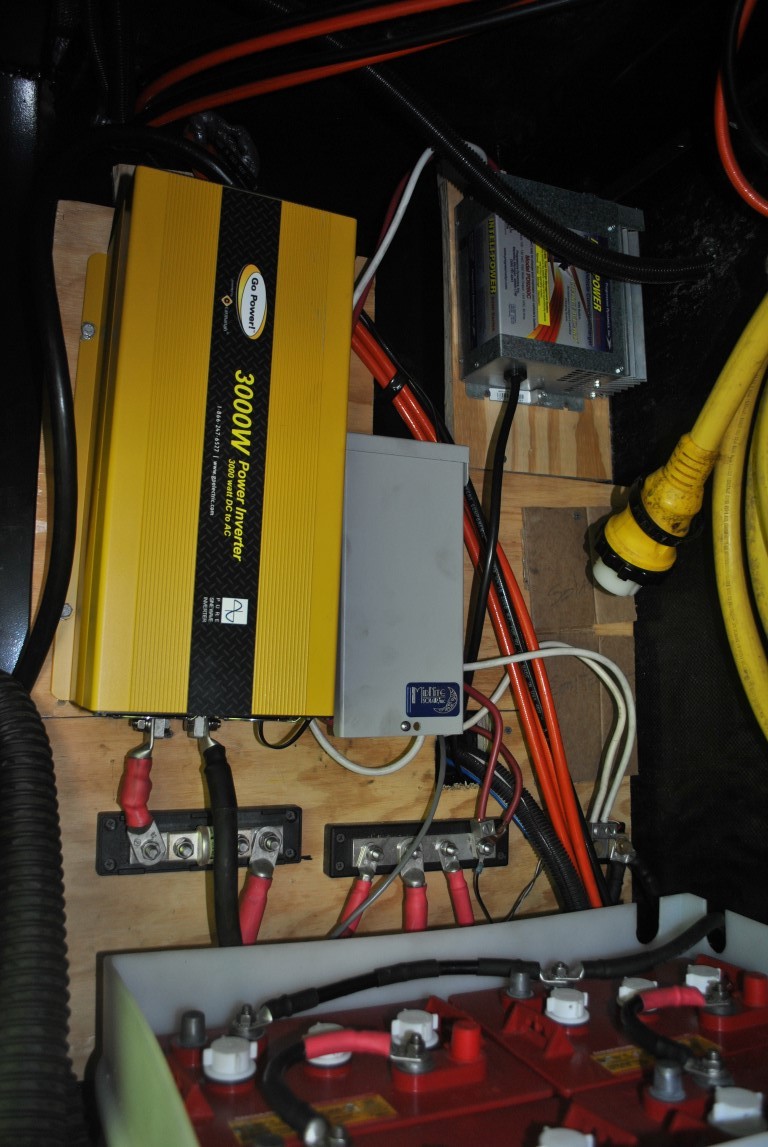
1 Go Power SW3000 Inverter & Remote
1 Go Power SW 300 Inverter
8 Deep Cycle Lead Acid Batteries (260 Ah 6 V each) *** Original Installation ***
3 Ohmmu Gen 3 Group 31 Deep Cycle Advanced Lithium 12V batteries ***** NEW ***** (These three batteries provide the same usable capacity (450 Ah @ 12v) that our 8 lead acid battery bank provided. They require the same space as four of our original batteries, and weigh less than 100# combined – vs 500# for the eight lead acid batteries!)
4 HYUNDAI 260 WATT HIS-S260MG MONO BLACK SOLAR PANEL
1 MORNINGSTAR TS-MPPT-60 TRISTAR 60 AMP MPPT CHARGE CONTROLLER
The Installation:
Here is a schematic of our system: Visio-Lucy Wiring Diagram-v5
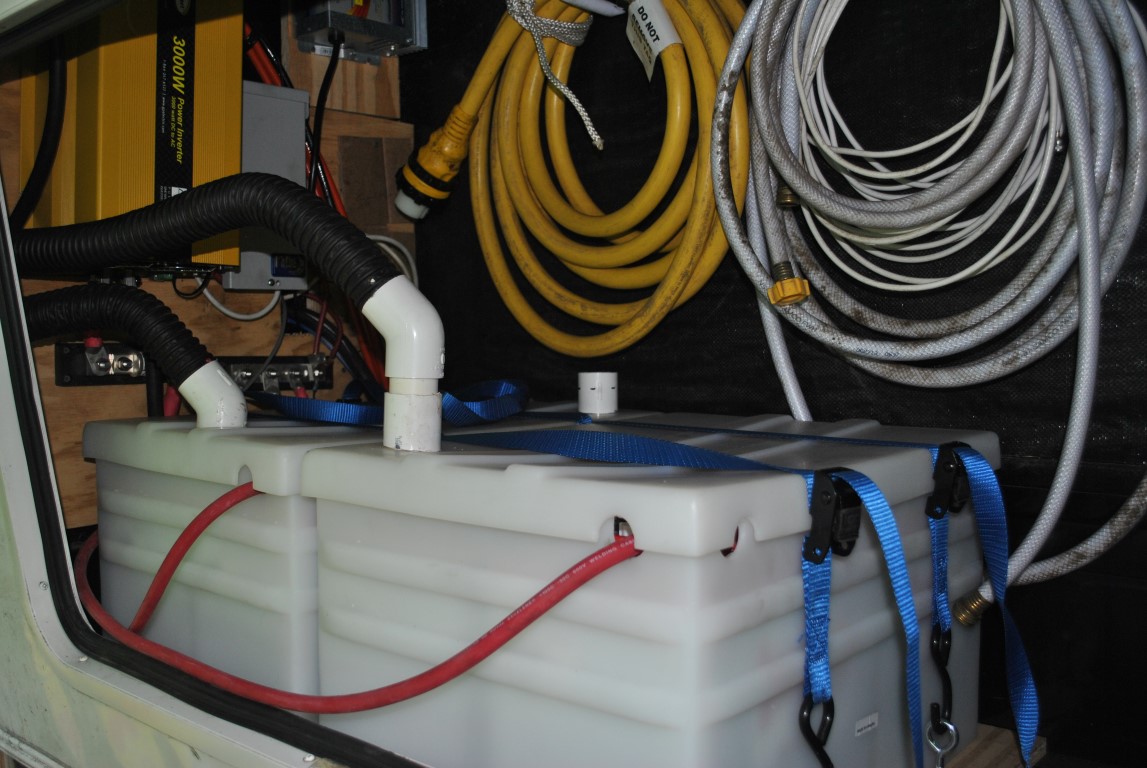
The eight batteries are wired with each pair of two batteries in series (to create one large 12 V battery) and the four pairs in parallel. All battery wiring was done with 4/0 welding cable. Batteries are installed in large plastic battery containers with four batteries in each, and vent hoses to the outside air.
Since the Morningstar TS-MPPT-60 can convert higher input voltages for charging 12 volt batteries, we used four solar panels (60 cell, 260 W, 36 V). Again, we wired each pair of panels in series for a combined nominal output of 72 volts x 260 watts. The higher voltage allowed us to use the standard solar panel connecting cables with minimal voltage drop. The down side to combining panels into a single series unit is that any shading on any panel in the group significantly reduces the output from the entire group; therefore, we installed as two groups of two to try to minimize this effect.
I installed a TRC model 40100 – 50 Amp Automatic Transfer Switch, and installed a second 50 amp female connection at the front of the trailer (the standard shore power connection is at the rear of the trailer & requires a non-standard connecting cable.) With this I can plug the 50 A cable coming from the 3000 W inverter into this receptacle – or I can connect to shore power at this location if the pedestal is located nearer the front of the trailer (I suppose I could even connect a generator if I wanted). I also moved the PD9260C battery charger and its connection to this same area so that I can easily disconnect the 110 battery charger whenever we are running on battery/inverter power. With this arrangement, power coming from the 3000 W inverter is being fed to the whole house electrical system. The whole house surge protector is engaged, and all of the power goes through the existing circuit breakers. The Transfer Switch is set to use the Inverter Input as the primary, and the trailer’s standard feed as the secondary. The only drawback to this configuration is the 30 second delay when the transfer switch secondary circuit is engaged – but I can live with that.
We found that frequently our biggest power drain was the background power requirements of the 3000 W inverter. However, my DW “really” likes the electric blanket if it is even a little cool outside. Our solution, we added a 300 W inverter with direct cables & outlets for the bedroom TV, phone chargers, and electric blanket. The background draw of the 300 W unit is almost negligible, so we leave it running all the time. We only turn on the 3,000 W inverter when we need other 110 power – like the microwave, coffee pot, or the big TV.
NOTE: Always disconnect your 110 battery charger when running on inverter power if you have your whole house electrical system connected. Using the inverter to feed the charger to feed the batteries to feed the inverter to feed the charger…. Is a downward spiral with the inefficiencies of each conversion stealing power until there is nothing left!


Original Post:
| Solar Plans – Summary | |||
| 12v Ah | |||
| Estimated Daily Electrical Usage | 330 | ||
| plus 25% safety factor | 412 | ||
| Solar Panels | |||
| HYUNDAI 260 WATT HIS-S260MG MONO SOLAR PANEL | 260 | Watts ea | |
| Number of panels | 4 | ||
| Effective Hours Solar | 6 | ||
| Total daily Watts | 6240 | ||
| 12 v Amp Hours generated | 520 | ||
| Battery Bank | |||
| Number of Batteries | 8 | ||
| Volt Amp rated capacity | 260 | ||
| Wired in Series for 12 V operation – Equiv. 12v | 4 | ||
| Total 12 Capacity in Amp Hours | 1040 | ||
| Max 50% Discharge; Usable Capacity | 520 | ||
| Solar Charge Controller | |||
| Morningstar Tristar TS-MPPT-60 | |||
| Input Capacity at 36v in Watts | 2400 | 66.66667 | amps |
| 4 Stage Battery Charging – 60 Amp max | 60 | ||
| Solar Charging Capacity – Maximum at 8 hrs | 480 | ||
| Power Inverter – 110 VAC | |||
| Go Power SW3000 & Remote – Pure Sine Wave | 3000 | watts | |
| Surge Power Capacity | 6000 | watts | |
| Maximum Efficiency | 90 | ||
| DC Converter Charger | |||
| PD9260C – 60 Amp RV Converter/Charger | 60 | Max Charge Rate | |
| (Shore power charging – unit already installed) | 24 | Shore Power connect hrs | |
| 1440 | Max 12v Amp Hours | ||
| Automatic Transfer Switch | |||
| TRC model 40100 – 50 Amp Automatic Transfer Switch | |||
For other aspects of making your decisions about RV Living, here are other posts on the subject: RV Life & Technical Details
We have a 40′ Fleetwood LE DP, we have 4 Optima AGM batteries=264 amp hours connected to our Xantrex Freedom 458 inverter/charger and 3 solar panels up top. We are looking to replace the batteries and have been checking into microcell carbon foam batteries, I thought though some research they looked interesting. Something new in the RV market, I was told they are used in the boating market with a good success rate. Also do we need a better inverter with this type of battery? Have you heard anything about them? http://www.fireflyenergy.com is there website. Thanks for any and all info you might have.
Sorry for the delay in responding … I missed your post.
While I have never used them, nor talked to anyone who has, the batteries look great on paper. Many innovations in the RV industry originated in the boating/sailing arena.
Regarding the charger, the key is whether your existing unit provides a charging profile that is appropriate for these batteries. Probably the battery supplier is the best source of info on that.
If you go this way, I would love to hear your results!
Very good and understandable information.